Showing posts with label 1 Picture. Show all posts

Monday, August 1, 2011

Get your Summer Shimmer on!

The latest Lucky Girl Crafts kit is out, and I've been hard at work! In August, we're highlighting each designer in their own individualized segments before a big mid-month blog hop, and I'm up first. Take a peek at my first projects:


This layout uses the bold, bright SEI paper from the kit, along with coordinating papers from Echo Park Paper and American Crafts. In addition to the August kit, I used a few small pieces from my stash (the tickets from MME, and the small yellow alpha from My Little Shoebox).

Link

These matching cards were created with the copper-foiled SEI Sunny Day paper in honor of the 2nd anniversary at Practical Scrappers. I also used some of the pink tulle from the May "Spring Soiree" kit and Thickers from our October "Boo Crew" kit.

Be sure to join us over at Practical Scrappers this week for a week-long online layout contest, where you'll be given two "ingredients" to add to your layout each day before the contest culminates on Saturday for a chance to win. We're also doing a huge blog hop on the 5th - so two great things you don't want to miss!

Check out the latest & greatest kit.... Summer Shimmer!


Summer Shimmer is packed full of bright designs, exquisite detailing and TONS of fantabulous embellies, it's a perfect compliment to all of your sassy summer projects!

Find our August kit, along with fabulous deals on paper packs from the last few kits and other great deals in our store now!

Monday, January 31, 2011

So proud... LGC Blog Party Day 2

Hey there. Thanks for joining us for our second day of celebrating the latest Lucky Girl Crafts kit, "Kid at Heart." If you're new to the party, check out the post above for details. And be sure to visit the rest of the Lucky Girls - you might get Lucky too!

Today's project brings out the bright, fun patterns to light with the Bo Bunny papers and some of my fave little embellies included in the kit.

Like any mom, I think my kiddos are the best. But sometimes, it's hard not to be super, over the moon, wildly, amazingly proud. This summer, my son and I went on a bike ride with my book club friends. What I thought was going to be a quick trip to the next town over (somehow, I forgot that this town is 12-1/2 miles away) was sooo long, and sooo hot. Uphill there, and we hit the headwind home, there were times when I wanted to quit. Seriously, I was about to call my husband to pick me up. But my son, Andrew? Nope. Not really. Sure, he wasn't thrilled the first mile, but after that - all I could say was WOW! Anyhow, I digress. (But thanks for letting me gloat about my awesome son!)

Check out what I created:

To frame the picture of my awesome son and Mt. Sopris in the background, I used the bright and fanciful colors of the Bo Bunny Block Party papers.

I fussy cut around some of the flourishes, and added a little Mod Podge Dimensional Glaze and scissor distressing to the largest designs. I traced the white, glittered Thickers, and traced my journaling around the core elements of the layout.

Finally, if you stuck with me through my proud parent/proud scrapper moment, who wants to get Lucky?

Each of the Lucky Girls on our blog party has some Lucky Bucks to give away, and each day of the party you'll have another chance to enter to win! Just follow these simple steps for a chance to win $7 Lucky Bucks to our store for my stop in the Blog Party!
Earn 1 entry for referring a friend to the LGC blog party

Earn 1 entry for answering today's question:
What's your favorite childhood (or kid at heart) pasttime?!

Earn 10 entries for the giveaways on all of the Lucky Girl Crafts Blog Party when you place any order between now and February 3!

Sunday, January 9, 2011

Show Me Sunday tutorial - Repurposed Ribbon

Hi friends! I hope you're enjoying your weekend.

I've got a new tutorial posted on Frosted Designs today, all on how to repurpose your ribbon scraps into beautiful flowers like these:


Using materials like this:


To use on a layout like this:

These fancy flowers also make great jewelry and hair accessories, too! Just sayin' ;)

For full instructions, please be sure to head on over to Frosted Designs!

Thursday, November 25, 2010

Thankful for you...

This week's theme at Frosted Designs is none other than Thankful (of course!) but we could use the theme however we wanted. I chose to spotlight a very special picture and moments that I will be forever thankful for...


This picture was taken last spring, with my grandfather surrounded by his great-grandchildren - my daughter Sophia, my niece Kaelee, my son Andrew, and my nephew Ashton. Not only is it special because few children have a chance to bond with their great grandparents, but it's special for so many more reasons. This was the one and only time he had been surrounded by all of his great grandchildren. He was such a special man with a huge heart, and he loved spoiling these kiddos.
Knowing how ill he was, we made it a point to visit as often as possible. I will be forever grateful for the time we spent with him, for listening to his stories about growing up in rural Georgia to meeting my grandmother, a petite Italian spitfire at the Air Force base in Florida, to his exploits with his years in the military. It was wonderful.
I hope you take some time this long holiday weekend to create in honor of gratitude!

Thursday, July 8, 2010

Felt Fun with Frosted Designs

This week at Frosted Designs we're exploring ways to incorporate felt into our projects. I was so excited to finally have an excuse to use some Kaiser Kraft Fozz Felt self-adhesive border that I've had in my stash for a while, especially since I used it in a way that I wasn't quite expecting.

My layout inspiration this week came from the latest sketch at Creative Scrappers, where Lucky Girl Crafts is sponsoring this week's giveaway. I used Sketch #111 - seen below - and realigned the design to where it fell mainly on the left hand side.


I played with some of my favorite papers from My Mind's Eye and created this fun layout of my *now* nearly 11-year-old son's baby pics. One day, maybe his baby album will actually be complete!!!

Cardstock: Bazzil (kraft) and Colorbok (orange)
Patterned Papers: My Mind's Eye
Embellies: Kaiser Kraft Felt Fozz Border; Doodlebug alpha stickers (which were traced and colored in for the title); Close To My Heart chipboard; misc. buttons

Thanks so much for visiting me today. If you're new here, I hope you sit back and stay awhile - I'd love to hear what you think. Be sure to pop on over to Frosted Designs for a chance to win our monthly challenge candy and for a good dose of inspiration!

Monday, June 7, 2010

Check out the June Lipstick Chicks Challenge!

The talented crew at XOXO Girls (aka Lipstick Chicks!) are at it again! Our June challenge is up and full of scrappy wonder for you to scraplift off of for a chance to win an amazing vintage-inspired prize pack sponsored by Divine Designs. It's amazing to see how each designer interpreted our challenge list this month - love it!

Here's my June XOXO layout:

This layout uses cardstock from Stampin' Up and Bazzill; paper flowers from Making Memories and Close To My Heart; bling from Prima; Anna Griffin glittered chipboard letters; Bo Bunny patterned paper, scalloped paper from Making Memories, and the Home Decor Cricut cartridge for the flourishes. The butterflies were punched from scraps with a Martha Stewart punch.

Finally, for your chance to win, head on over to the XOXO Girls blog and pick your favorite layout (or layouts!) to lift, post a comment with a link to your layout and cross your fingers in hopes of winning this fun kit:


Please be sure to mention which Lipstick Chick you lifted from and spread the word about this awesome challenge!!!

XOXO -
Jessica

Tuesday, May 11, 2010

Gettin' a little punchy!


Practical Scrappers has a great challenge this week... Get your punches out and get ready to play along!

I don't know about you, but I really dig the fancy-pants layered flowers on the market out there. Problem is, I live in a small town and the nearest scrapbook store is nearly 2 hours away, and I feel so guilty for ordering just a package or two of the blossoms on-line that I don't get my hands on them nearly as often as I'd like.

For this layout, I created 3D flowers using my Stampin' Up Boho Blossoms punch. I punched the flowers out of several different patterned paper, distressed the edges and, once the ink was dry (this is a key hint, by the way! Otherwise your ink gets all over and ruins the pretty effect you're trying so hard to create...), simply crimp, crunch and crumple the blossoms up. Once that's done, either poke holes through the center of your buttons and attach with a brad, or use glue dots to secure each blossom and top with pretty gems.

Here's how they turned out:

Really, once I got the hang of it, I quickly became addicted to them and made more than I needed for this layout, which I'm sure will adorn some other project in the very near future.

All of the patterned papers were from My Mind's Eye, with some Zva bling, Kaiser Craft adhesive pearls, and vintage lace thrown in the mix. I also used a pearly flower from Prima, some cardstock from Stampin' Up, a strip of wide blue ribbon from Target's dollar spot and K&Co. letter stickers. Oh - and can you spot the other punches I used? The scallop circle journaling tag is from Stampin' Up, and the "Threading Water" border punch is from Fiskars.

Thanks so much for stopping by! Don't forget ... the deadline for my Lucky Girl DT call is this Friday. Check out this post here for more details on how to enter!

Friday, May 7, 2010

I'm a Lipstick Chick!!!! Check out my first challenge layout!

I was recently invited to become a part of the xOxO Girls Design Team - The Lipstick Chicks - and today is our big reveal!

The xOxO Girls blog is all about the art of scraplifting! I don't know about you, but some of my best layouts are inspired by the artists whose blogs I regularly peruse - whether it's the layout, color combo, title or artistic elements, you all are some awesome artists.

At xOxO we celebrate the scraplift! The huge DT posts their layouts towards the beginning of the month, then you have a whole month to scraplift from one of the 25 layouts for a chance to win some scrappy awesomeness! The May challenge is sponsored by Color Me Miki - enter the challenge for a chance to win one of their fantastic kits.

For our DT pic, we had to don bright lipstick....

I never wear lipstick, especially in such bright colors, but it inspired me to create this:


For our May challenge, our layout had to use at least 5 of the following journal prompts:

1. Floral Print
2. Script
3. Teal
4. Burnt Orange
5. Black Alphas
6. Bird
7. Butterfly
8. Teal Flowers
9. Twigs/Branches/Trees
10. Pinkish/Red Flowers

I used them all except for the bird, because really, I think birds are kind of creepy. But that's just me.

Now go and scraplift from one of these amazing creations here and enter for your chance to win!!!

Thursday, May 6, 2010

Baby, get your groove on...


This week's challenge at Frosted Designs is sanding!

For my layout, I created a faux-linen look by sanding first horizontally, then vertically on the white-core cardstock. All products on this layout are old-school Close To My Heart.

Thanks for popping in! Be sure to check out my first-ever Lucky Girl DT Call by clicking here.

Friday, April 30, 2010

Beachy Keen Buttons

Buttons, buttons, buttons galore and a few buttons more. I collect buttons like I collect ribbon - meaning I have them everywhere!

This week's challenge at Practical Scrappers was the perfect chance to make buttons shine. On this layout, I used buttons in a rather non-traditional way by inserting brads through the button holes for the centers of the flowers. The smaller brads fit through just fine, but the larger brads - like the bling brads from Stampin' Up - have wider prongs. For those, I used my Close To My Heart precision file to sand down the holes until the wider prongs could slide through. ***TIP - this sanding thing works much better on harder (typically shiny) buttons. Though it wasn't impossible on the softer plastic ones it took much longer. ***

For this layout, I used papers from Little Yellow Bicycle and Sassafras Lass - still from my Magpie Kit. I love this kit and still have tons left, so you'll be seeing more projects with those products, I'm sure! The cardstock is Bazzill and Coredinations, and a mixture of Prima, Petalloo and Close To My Heart flowers. The alphabet stickers are puffy Rainboots Thickers (my favorite of all of my favorite Thickers!) - the words were outlined with a fine tipped journaling pen.

Thanks for visiting me and be sure to stop by Practical Scrappers to see other innovative ways to use up your button stash!!!

Thursday, April 29, 2010

It's color challenge week at Frosted Designs!

This week we were challenged to use three colors in our projects:
Teal Brown Lime Green
I used a scrap patterned paper in the challenge color palette from my stash; flowers from Bazzill Basics (large brown daisy) and Prima (pearly flowers); sparkly teal brads from Reminisce and stamped brown swirls from Close To My Heart. The title stickers are puffy Thickers from American Crafts.

Be sure to stop by Frosted Designs for more inspiration in this charming color bracket!

Thursday, April 22, 2010

The masked crusader...

Frosted Designs challenge this week is to mask something... either with tape, ink, paint, glimmer
mists, etc. I was excited about this challenge because, though I don't often use masking, it's one of my favorite techniques.

For this layout - once again made with my April Magpie kit, I arranged chipboard flourishes on my white cardstock before spraying on some home-made glimmer mist. I distressed my edges with pearly blue paint. Papers are from Little Yellow Bicycle, stickers are Prima, and cardstock is from Bazzill. The rest is from my scrap stash.

*HINT* To keep the masking parts from flying around when you spray your mist, attach a small bit of repositionable adhesive to the backside. This will keep your pieces in place for nice, clear masked images.


Monday, March 15, 2010

Better late than never... last week's Practical Scrappers Ink Challenge


Sorry to have been absent lately but I have been soooooo very sick for the past week... literally. I went to the doc today because I just couldn't bear it anymore, just to find out that I have an inner ear virus that is causing vertigo, kind of like being an "old drunk" according to my doctor, and that my symptoms can last up to a month. Ugh!!! I hate this feeling, which is why I don't ever drink in excess, and here I have that feeling for no good reason. Way not fun. At least I have some meds to help ward off the nasty feeling, I guess.


Anywho, enough about me... here's my layout for last week's white pen/ink challenge at Practical Scrappers.
I really don't play with my white pens as often as I should, because I really like the way they look. I used my white pen to add a doodled frame around the picture and to trace some of the edges of the flourish shape and Prima flowers. This page uses Basic Gray papers & journaling spot, Bazzill cardstock & stitched ribbon, Bo Bunny gingham ribbon and miscellaneous brads
& letter stickers. The flourish is from the Home Decor Cricut cartridge - another fave! (Thanks, Juanita for letting me hog your machine at our last crop!!!)

Thanks so much for looking. Be back soon with some other fun designs to share!!!

Thursday, March 4, 2010

A whole new way to use your stamp pads

This week's challenge at Practical Scrappers was to use inks and chalks. Instead of the same ol' distressing technique, I decided to use my ink pad for another purpose - to make my patterned paper.

For this layout, I used my Tim Holtz distress ink pad to create a patterned band of off-set squares directly onto my Bazzill cardstock - between the ink pad and the texture of the cardstock, it got a great, distressed look. I also used my StazOn ink to stamp some flourishes in the corner of the photo, then added a hand-drawn title (minus the awesome) with crafting markers.

The only other products I used on this layout were American Crafts foam Thickers and Kaiser Craft brads.

Saturday, February 13, 2010

If only they'd stop...

I don't think that new parents truly realize how true the saying is about kids growing up too fast. I know I didn't, until I had my own children. Now Andrew, at 10, is the same size as I am, and Sophia, at 6, is already reading chapter books and starting to develop a style of her own. I can hardly remember when we took them home from the hospital! Gaaa!!!!

This layout is of my Sophie-girl and my little sister, Clare from last summer. They're all dressed up and looking waaaayyyy too old, but they're pretty stinkin' cute.

I completed this layout for the American Crafts weekly challenge on their blog here. This week they're challenging people to use two or more American Crafts products in a layout or project, and since I just got some of their beautiful Letterbox papers and more of my favorites, Thickers (love them!!!), I thought it would be a great chance. Who wouldn't want to win a goody box of brand - spankin' - new products that were unveiled at CHA?

This layout uses American Crafts Letterbox patterned papers, puffy Rainboots and fabric Delight Thickers, plus some Prima flowers and random ribbon & buttons.

Thanks so much for stopping by!

Thursday, February 11, 2010

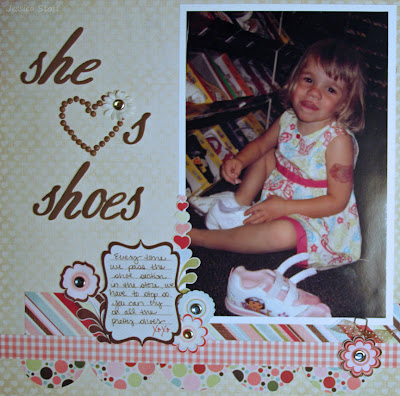
Fostering a good love of shoes...

I think I've taught my daughter well. My husband, on the other hand, thinks I've ruined her....
Her shoe obsession started at a young age and it just grows every year. How could I not scrap that?!

This layout is for the brad challenge this week at Practical Scrappers. Yeah - because brads are one of my favorite things to use on my projects. I created a heart with my brads - awkward as it might be, but I love how it turned out. I also used some blingy brads for the center of the flowers that were cut out from Pink Paislee paper. All patterned papers on this are Pink Paislee (this happens to be one of the layouts for my upcoming Love Always scrapbook workshop next weekend); the cardstock is Bazzill, and brads are Close To My Heart (chocolate) and Stampin' Up (blingy). Title is in Salutations Thickers from American Crafts.

P.S. Don't forget to leave a comment on my SECOND CHANCE BLOG CANDY GIVEAWAY before midnight Saturday MST - and check out all of the fabulous projects from the amazing Practical Scrappers design team, too!

Friday, January 29, 2010

Puttin' on the Glitz & stealing center stage!

While I was blog hopping this week, I came across one of my favorite scrapper - Jamie Harder's - blog and found this cute sketch from Sketch Inspiration:


It was perfect for the layout I had in mind for the special weekend challenge at Practical Scrappers. We'll be spotlighting one of our great sponsors, Glitz Designs. They have such great papers - fun, bright & unique designs that are sure to make your layouts pop!


Just last week, I got one of the September Kit from JuJu Bee's Scrapbook Corner, which featured TONS of great Glitz products, including several sheets of fun, bright patterend papers. They went great with pics of Soph's last recital.


The patterned paper and popped-up heart are all from Glitz Designs. I also trimmed one rose out of the swirly musical note paper and popped that up too. I added a little Prima blingy flourish that my awesome Practical Scrappers secret sister sent this week(!), some glitter letter stickers from Making Memories, a Pink Paislee "fashionista" rub on, a touch of crochet trim and some bright blue Double Dot cardstock from Bo Bunny. Everything was ink distressed with my Powder Puffs Midnight Confession ink pad.


This layout also qualifies for the Candy Shoppe Designs "Out with the Old, In with the New" challenge - where you're to use you're most recently purchased/received scrap product (even if you haven't gotten anything new in a while). They have some neat rules for their prize givaways - just answer one question, plus get extra chances for signing up as a follower, completing the challenge and/or posting about the challenge. Definitely worth a stop to check them out!

Thanks so much for stopping by!

Saturday, January 23, 2010

A Quiet Affection - Practical Scrappers blog hop project #3!

Thanks for popping back by my blog!

For today's love-themed layout, I chose to honor my parents - or at least one of the three sets of them. My mom and step-dad share a quiet affection and aren't big on PDAs, so catching a little love on film is a rare and special occurance.

Though you can't tell from my picture, it uses four different kinds of patterend paper. The big green polka dot paper from My Mind's Eye is obvious, as is (probably) the wood-textured designed blue photo mat from DCWV. But the flowers and swirls were on two separate sheets of patterened paper (both DCWV), that when used as-is, could overwhelm a layout.

Instead, I cut out my favorite parts of each of the patterns and was able to arrange them in a way that best suit my picture.


Once I cut out the flowers, I curled the edges up a bit to add a little more dimension.

Besides the DCWV and My Minds Eye papers, it uses Co'Ordinations Cardstock, Bazzill Cardstock, Jenni Bowlin Rub-Ons, American Crafts Thickers and K&Co. heart sticker.

Thanks again for stopping by. Join me tomorrow for the final Practical Scrappers Valentine's blog hop project and a chance to win some yummy candy! Prize will be drawn around 10 PM MST Monday, so you still have time to enter & tell your friends!!!!

Friday, January 22, 2010

Sweetie / Practical Scrappers Blog Hop Project 2!

OK, so this is technically a few hours early to be considered "Saturday's" post in most areas, but my hubby is banishing me from the house for a men-only Rock Band party and I'm headed out for an evening all to myself with some of my favorite gal pals!
For those of who who have already stopped by my blog today from Practical Scrappers Designer Blog Hop, thank you for your kind words! You are all an inspiriation to me and your comments mean the world to me. Thank you.
This project is a continuation of the blog hop. Don't forget to check out all of the rest of the sites listed for more fun!
This layout was inspired by a Sketchy Thursday's sketch - love them!
It uses swirl stamps from Sizzix, a word and cupcake stamp from Target's Dollar Spot (this year) and cardstock from Bazzill. The ribbon was extra stuff on hand. I also used some of my home-made glimmer mist that I had left over from my Practical Scrappers bling layout last week.
Thanks again for stopping by!

Thursday, January 21, 2010

Emboss it, baby!

Don't you just love a throw back to old supplies? There's something kind of fun in digging deep into your stash and bringing new life to a product. That's how I feel about embossing.
It's been so long since I "wet" embossed (using ink and embossing powder vs. "dry" embossing using a texture machine) that my poor heat gun has a layer of dust.

I finally got a chance to put that heat gun to good use with this week's embossing challenge at Practical Scrappers. Here's the final product:

I used both wet and dry embossing techniques on my layout. My favorite embossing powder is called Iridescent Ice from Stampin' Up. It's a clear powder with glitter, so it matches everything. Talk about a great investment. I distressed my red heart paper with VersaMark and poured the Iridescent Ice all over for a "emboss distressed" look. I also used the same embossing powder on my title letters and the chipboard swirly.

I dry embossed some coordinating teal cardstock with my little Texture Botique purse - super cute & handy. Once the cardstock was embossed using an embossing folder, I punched some circles out & added those to my layout.

Here's a better view:

In addition the the products already mentioned, this layout features Bazzill cardstock & chipboard swirl; Petalloo blingy florettes; and Close To My Heart heart paper, stamps, rub-ons, and ink.

Thanks so much for stopping by and don't forget to join us for the Practical Scrappers Valentine's Blog Hop for great projects & tons of prizes starting here.