Showing posts with label Gift Ideas. Show all posts

Friday, March 18, 2011

Hey good looking!

Happy Friday, friends! This morning we woke up to 5” of heavy, wet spring snow… just two days after my son was wearing shorts to school. The snow is expected to melt by this afternoon, with temps forecasted in the upper 50s. Aaaahhh, spring in Colorado. There’s nothing quite like it!

It’s been a busy few weeks, but I found some time to play with my March Lucky Girl kit – Homemade Happiness. I finished up a few little projects I had created with the Echo Park loveliness in the kit, creating this card with a hand-cut & embellished apron plus a little cupcake box – all from the scraps I had left over from my layout projects!

I can’t believe how many projects I was able to get out of one kit. A total of EIGHT fully embellished layouts, four cards and the cupcake box – seriously a steal for just $29.99! I even have a few extra goodies left for other projects, too. Being thrifty always makes me smile! There’s even a few of the kits left in the store – hurry and grab yours today before they’re gone!

Anyhow - I used scraps from this layout and this layout to create everything here.

My apron was trimmed from the reverse side of the Echo Park - For the Record "Stamp of Approval" paper - that beautiful red pattern was perfect for it! After hand-cutting out my little apron, I embellished it with one of the Echo Park - For the Record "Noteworthy" journal spots that I trimmed down for the front pocket, a little of the black pom pom trim from the kit, and some ricrac and stitched grosgrain from my stash. The apron turned out so cute, I wish it was real so I could have it!

The little box was done with the scraps from the Echo Park - For the Record "Tablecloth" paper I used on my "What I Like Best" layout. I added a little American Crafts ribbon and assorted little flowers. The flag was also from the Echo Park - For the Record "Noteworthy" paper, and was added onto a toothpick with some fun green flowers for a cake topper.
I hope your weekend treats you sweetly!

Thursday, January 20, 2011

Clearly yours... Valentine's treat bag

TGIF! Happy Friday, friends. I hope you've had a great week.
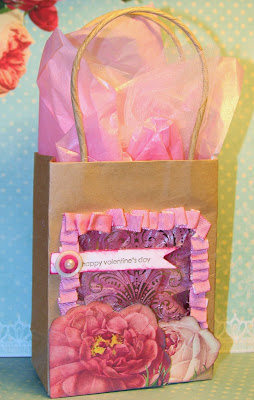
This week's challenge at Frosted Designs is all about being clear. The talented DT was tasked to use transparencies or acrylic elements in their proejcts this week. For me, this challenge came at a perfect time. I've been using the last little bits of my January Lucky Girl Crafts kit, which was packed with the lovely Pink Paislee Sweetness line, including one of their awesome acrylic cards. Serendipitous, right?!
Take a peek at my altered Valentine's treat bag:
I disassembled the mini gift bagbag to cut a window out of the front, then hot glued one of the Sweetness Clear Cards along the inside of the bag. Once that was done, I reassembled the bag and decorated the front with pleated grosgrain ribbon & fussy cut flowers from the Love Blooms paper. I added a little Shimmerz to the roses, a few layered buttons and a little Valentine's banner to tie it all together. The inside gift is wrapped in shimmery tissue paper and tulle.
So, what do you think? One of the participants at this morning's Two Rivers MOPS meetings is the lucky winner of this goody bag, filled, of course, with lots of scrappy goodies.

Friday, December 11, 2009

Christmas Chocolate... post 2 of 2

This year each of my kiddos have about 10 teachers - even Soph who's in kindergarten, because even those little ones go to a different class for nearly every subject - so we're going to be doing TONS of teacher gifts this year.

Our challenge this week at Frosted Designs was to create something winter or Christmas themed, so I thought it would be the perfect chance to get started on some of them!

Here's a little thank you gift that we'll be giving to their specials and subject-y teachers (like gym, library, math, etc.) It's a little purse filled with Ghiradelli chocolate squares - my favorite.

The inside has enough room for the kiddos to write their own greetings and to include a 3x5 picture of them if we are so inclined. I didn't get quite that far with this one, so I subbed the inside picture with a coordinating piece of paper.

Once I created the template, it was actually a pretty easy project. I love how cute and quick it was - especially since I have so many of them to make!
This was made with a bunch of products from my stash, so I don't know who makes everything. The cardstock was Bazzill, the silver twine and rub-on were Stampin' Up, the chipboard snowflake was Maya Road and the crackle paint is Tim Holtz by Ranger. For this project, I found that the purse itself looks best in a coordinating color to the patterned papers you're using (i.e. not white or cream) beacause it really makes the rest of your project really pop. But hey, that's just me! =)
Hope you all have a safe & happy holiday season! Thanks for reading!

Thursday, December 10, 2009

Christmas Chocolate... post 1 of 2

I don't know what the weather has been like where you are, but here in the Colorado Rockies it's been positively chilly! Tonight, it was down to -6 by 7:30. Brrrr.... There is nothing I like more in cold weather than a nice, steaming hot cup of cocoa, extra chocolaty, filled to the brim with marshmallows with a candy cane stir stick. Just thinking about it makes warm and cozy... I might have to have me a cup before I go to bed.
Anywho, our project this week at Practical Scrappers was to share a gift wrapping idea or something we've made as a gift. This little altered lunch tin fits both categories:
It would be great alone as gift wrapping for a small present (like a few pairs of fun & funky socks), or to hold this Warm Winter Wishes gift set, filled with all the fixings for the perfect cup of cocoa:
Hot Cocoa
Tons of Mini Marshmallows
Mini Chocolate Chips
Mini Candy Canes

This tin was originally used as packaging for some chipboard snowflakes from Maya Road. The papers and die cut girl are from My Mind's Eye - the little Eskimo girl has some Stickles for a little extra jazzy touch. I added some rub-on snowflakes from Stampin' Up and tons of ribbon from my stash to complete the look.