Showing posts with label Altered Project. Show all posts

Friday, July 15, 2011

It's a Mini-Mania @ Lucky Girl Crafts!!!

Hi Friends!

The Lucky Girls have been having a blast creating with our Mid-Summer Mini kit, Beach Babes (and the subscriber extra - Beachy Keen). The bold prints and bright colors are perfect for all those summer pics & projects!

To celebrate the middle of summer, we're having our

JULY MINI-MANIA BLOG PARTY
July 15-17
Visit each of the Lucky Girls to check out their take on our "mini" challenge - there are some phenomenal projects out there, plus a chance to WIN for one of our Lucky Girl fans (world wide!)

Oh, and did you know it's Christmas in July at Lucky Girl Crafts?
You get a FREE GIFT with any order placed in our store - the bigger your purchase, the more goodies you'll see under your tree in your mail!

Without further ado, here's my mini... a memory box sized perfectly for vacation photos and mementos (5"x6") - though this weekend I'll be taking in my carry-on luggage on my flight to Boston, filled with card-making supplies and trinkets. I need something to keep me occupied for 4 hours!


With a little sparkle and bling, it's going to capture all of our "flashy" beach memories. Aren't those Bo Bunny papers & accents divine?


A little sparkle and shine included with the casual design mimic the summer sights.


Some foam pop dots add dimension to the hibiscus journaling shape and a few more add a little extra pop to the metal trinket. These were combined with the chipboard alpha, which was painted over with Shimmerz watercolors and spritzed with glimmer mist for a watery effect.


Recipe for Beach Vacation Mini: July 2011 Mid-Summer Mini Lucky Girl Crafts Kit - Beach Babes Bo Bunny Barefoot & Bliss Papers, Trinket & Die Cut // Handmade Glittered Flourish Tag // My Mind's Eye Lush Chipboard Alphabet // Imaginisce Studded Sticker - Hibiscus // Yellow Grosgrain Ribbon Other: Shimmerz Water Color Paint // Tattered Angels Glimmer Mist // ModPodge Dimensional GlazeLink

Wanna win a little summer embellie package, filled with flourishes and bling, flowers & journaling spots and more?!

Simply play along with our blog party and leave a comment on each of the Lucky Girl's party posts to earn your entry! Once you've visited each Lucky Girl, please come back here and tell us what your favorite mini project was in this month's hop. One winner will be announced on the store blog next week.

Store Blog
Natalie
Jessica <==== You are here!
Ana
Sabrina

Participants must visit & comment on each blog for a chance to win the Blog Party prize. This one's open to Lucky Girls world wide!

For an extra entry, play along with our Mini Mania July Challenge Contest (check out the Store Blog for more deets!)

Friday, March 18, 2011

Hey good looking!

Happy Friday, friends! This morning we woke up to 5” of heavy, wet spring snow… just two days after my son was wearing shorts to school. The snow is expected to melt by this afternoon, with temps forecasted in the upper 50s. Aaaahhh, spring in Colorado. There’s nothing quite like it!

It’s been a busy few weeks, but I found some time to play with my March Lucky Girl kit – Homemade Happiness. I finished up a few little projects I had created with the Echo Park loveliness in the kit, creating this card with a hand-cut & embellished apron plus a little cupcake box – all from the scraps I had left over from my layout projects!

I can’t believe how many projects I was able to get out of one kit. A total of EIGHT fully embellished layouts, four cards and the cupcake box – seriously a steal for just $29.99! I even have a few extra goodies left for other projects, too. Being thrifty always makes me smile! There’s even a few of the kits left in the store – hurry and grab yours today before they’re gone!

Anyhow - I used scraps from this layout and this layout to create everything here.

My apron was trimmed from the reverse side of the Echo Park - For the Record "Stamp of Approval" paper - that beautiful red pattern was perfect for it! After hand-cutting out my little apron, I embellished it with one of the Echo Park - For the Record "Noteworthy" journal spots that I trimmed down for the front pocket, a little of the black pom pom trim from the kit, and some ricrac and stitched grosgrain from my stash. The apron turned out so cute, I wish it was real so I could have it!

The little box was done with the scraps from the Echo Park - For the Record "Tablecloth" paper I used on my "What I Like Best" layout. I added a little American Crafts ribbon and assorted little flowers. The flag was also from the Echo Park - For the Record "Noteworthy" paper, and was added onto a toothpick with some fun green flowers for a cake topper.
I hope your weekend treats you sweetly!

Thursday, January 20, 2011

Clearly yours... Valentine's treat bag

TGIF! Happy Friday, friends. I hope you've had a great week.
This week's challenge at Frosted Designs is all about being clear. The talented DT was tasked to use transparencies or acrylic elements in their proejcts this week. For me, this challenge came at a perfect time. I've been using the last little bits of my January Lucky Girl Crafts kit, which was packed with the lovely Pink Paislee Sweetness line, including one of their awesome acrylic cards. Serendipitous, right?!
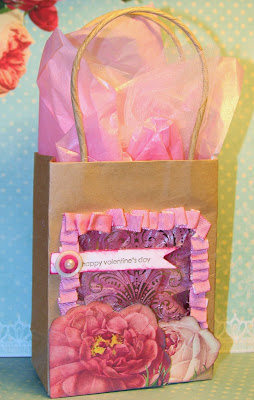
Take a peek at my altered Valentine's treat bag:
I disassembled the mini gift bagbag to cut a window out of the front, then hot glued one of the Sweetness Clear Cards along the inside of the bag. Once that was done, I reassembled the bag and decorated the front with pleated grosgrain ribbon & fussy cut flowers from the Love Blooms paper. I added a little Shimmerz to the roses, a few layered buttons and a little Valentine's banner to tie it all together. The inside gift is wrapped in shimmery tissue paper and tulle.
So, what do you think? One of the participants at this morning's Two Rivers MOPS meetings is the lucky winner of this goody bag, filled, of course, with lots of scrappy goodies.

Thursday, January 6, 2011

Join the fun for our first Friday Fun Day Challenge @ LGC!

Hi friends & happy Friday! I don't know about you, but I am soooo glad this day has arrived. After a long week, I look forward to a weekend of being crafty and selling Girl Scout cookies with Soph like it's nobody's business. At least we get to visit some of our old, totally awesome friends that we haven't seen in ages.


Not only am I excited for the weekend, but I am thrilled about the two projects I have for you today. (Please see the post prior to this one for my Frosted Designs project!)

First, have you heard? Lucky Girl Crafts just started our new weekly challenges with a kick-butt monthly prize and it rocks!


Our Lucky Girls will be posting new projects each and every Friday for you to gain inspiration from using the overall design, color combination, project title and/or use of embellies. At the close of the month, we'll pick the best of the bunch for a chance to win the latest Lucky Girl Crafts kit or store credit. Check out this link here for full rules & details so you can play along!

Here's our first Friday Fun Day project inspiration for your crafting pleasure:

You've Got Mail


I used some of my left over papers from the January LGC Kit "Forever Love" for this altered tin mini mail box, plus flowers, ribbon and bling from my stash. For the little flourish, I cut out the corner of the American Crafts Dear Lizzy Oliver Die Cut paper from the kit and used it as a mask. I sponged acrylic paint over my home-made mask, then outlined it in fine tipped permanent marker to make it stand out against the striped paper.

I am also playing along in this week's ScrapFit challenge, which is to use scraps. You'll see more of Lucky Girl Crafts as the February ScrapFit sponsor, and more of me there next month when I'm their guest DT!

Saturday, January 1, 2011

Lucky Girl Dollar Aisle Makeover - Blog Party Day 2

Thanks for joining me again for the Lucky Girl Crafts blog party! I hope you're enjoying your weekend as much as I have been. It's been nice and relaxing - filled with movies and cuddles with my family. Pretty awesome, all in all.

Today's celebration of the Forever Love January 2011 Lucky Girl Crafts Kit brings a dollar aisle make over home decor project. Something I've been wanting to do for a long time, but none of my products had spoken to me (creatively, you know) until now. There was something about those beautiful vintage-inspired flowers on the Pink Paislee paper that just shouted to me - "CREATE!"
So, here's my fun, funky, vintage-y new sign for my soon-to-be redecorated craft area. It's made with a dollar aisle cork board that was already painted pink. Even if the cork board actually cost $2.50 - I still scored a sweet deal!
I fussy-cut the roses out of both sheets of the Pink Paislee patterned papers included in this month's kit and compiled them into a large bouquet. I used my super-old Making Memories foam letter stamps for the main title, along with some Pearl Plaid paint. Once that dried, I outlined it with a fine tipped Sharpie marker, then added my Thickers & Doodlebug letters. I Mod-Podged over the whole thing, then added a 1-1/2" double sided satin sash for hanging it.
Get your own kit that combines the vintage style and bright colors now before they're gone!
Love the kit? You're going to LOVE these specials:

Get FREE SHIPPING anywhere in the U.S. with orders of $40 or more through January 7th - use code FOREVERLOVE at checkout.
For international orders, please contact me for discounted shipping rates January 1-7 by e-mailing your order to jasafras98@yahoo.com
Save 20% on all current stock of "extras" through January 31 or while supplies last! Prices as marked. Sale includes past kits, paper packets, ribbons, alphas, embellies & more!
Please be sure to stop by the rest of the Lucky Girls to check out their fantastic work with this month's kit, plus get more chances to win Lucky Girl store credit!
MARK YOUR CALENDARS:
January 7th - last day to apply for our new Lucky Girl Design Team!Check out the details by clicking here.

Coming soon... weekly Friday Fun Day Challenges, featuring new work each and every Friday on the store blog for you to scrap lift, create & enter to win! Join us for the first one, Friday, January 7th.
**********
Finally, for your chance to win a lucky $7 store credit to Lucky Girl Crafts - answer today's question for me:

* Do you have a New Year's resolution? If so, what is it?

Earn 10 entries for the giveaways on all of the Lucky Girl Crafts Blog Party when you place any order between now and January 3!

Friday, January 15, 2010

Valentine Barrette Bling!

I've been inspired lately to do new things with my scrap supplies. For Christmas, I made Soph one of those giant flower barrettes that seem to be all the rage, because, really, they're super cute and I had everything on hand.

Here she is with Daddy and Andrew on Christmas eve sporting her awesome new barrette:

The best thing about it was I could personalize the barrette to fit the holiday - for Chirstmas it was sporting a 1" brad that said Merry & Bright.

I blinged up the same barrette in honor of Practical Scrapper's blingy challenge for the week and switched it around to a Valentine's Day-theme with some Stickled edges on my red flower and switched to a glittery heart brad for the center.

Here's my little ham is sporting the fabulous new blingy version:
From start to finish it took me about 5 minutes, including rifling through my flowers to find the perfect combo, popping the brad through the layers, hot gluing ribbon around an alligator clip and finally, hot gluing the flowers to the top of the barrette. Plus, I didn't have to spend the $15 I would have had I bought it in a store.
Gotta love that, right?!
Be sure to check out all of the other awesome creations that the Practical Scrappers Design Team has been up to this week!

Friday, December 11, 2009

Christmas Chocolate... post 2 of 2

This year each of my kiddos have about 10 teachers - even Soph who's in kindergarten, because even those little ones go to a different class for nearly every subject - so we're going to be doing TONS of teacher gifts this year.

Our challenge this week at Frosted Designs was to create something winter or Christmas themed, so I thought it would be the perfect chance to get started on some of them!

Here's a little thank you gift that we'll be giving to their specials and subject-y teachers (like gym, library, math, etc.) It's a little purse filled with Ghiradelli chocolate squares - my favorite.

The inside has enough room for the kiddos to write their own greetings and to include a 3x5 picture of them if we are so inclined. I didn't get quite that far with this one, so I subbed the inside picture with a coordinating piece of paper.

Once I created the template, it was actually a pretty easy project. I love how cute and quick it was - especially since I have so many of them to make!
This was made with a bunch of products from my stash, so I don't know who makes everything. The cardstock was Bazzill, the silver twine and rub-on were Stampin' Up, the chipboard snowflake was Maya Road and the crackle paint is Tim Holtz by Ranger. For this project, I found that the purse itself looks best in a coordinating color to the patterned papers you're using (i.e. not white or cream) beacause it really makes the rest of your project really pop. But hey, that's just me! =)
Hope you all have a safe & happy holiday season! Thanks for reading!

Thursday, December 10, 2009

Christmas Chocolate... post 1 of 2

I don't know what the weather has been like where you are, but here in the Colorado Rockies it's been positively chilly! Tonight, it was down to -6 by 7:30. Brrrr.... There is nothing I like more in cold weather than a nice, steaming hot cup of cocoa, extra chocolaty, filled to the brim with marshmallows with a candy cane stir stick. Just thinking about it makes warm and cozy... I might have to have me a cup before I go to bed.
Anywho, our project this week at Practical Scrappers was to share a gift wrapping idea or something we've made as a gift. This little altered lunch tin fits both categories:
It would be great alone as gift wrapping for a small present (like a few pairs of fun & funky socks), or to hold this Warm Winter Wishes gift set, filled with all the fixings for the perfect cup of cocoa:
Hot Cocoa
Tons of Mini Marshmallows
Mini Chocolate Chips
Mini Candy Canes

This tin was originally used as packaging for some chipboard snowflakes from Maya Road. The papers and die cut girl are from My Mind's Eye - the little Eskimo girl has some Stickles for a little extra jazzy touch. I added some rub-on snowflakes from Stampin' Up and tons of ribbon from my stash to complete the look.

Thursday, November 19, 2009

Get your paint on! Practical Scrappers magnetic board project!

Our challenge this week over at Frosted Designs was to create a project using acrylic paint. What fun! I love getting my paint on - particularly when my six year old daughter isn't there to "help" me! LOL!

Here's a pretty cute and relatively easy holiday gift idea.
I picked up a magnetic sign from Target's dollar spot a few months back - not because I liked the sign particularly, but because I thought I'd one day, eventually, alter it.

I used the Perfect Day papers from CTMH, as well as CTMH Just Blooms, Create-A-Shade Pearl Paint, CTMH Rub-Ons, a little bling & Stampin' Up Chocolate Chip Ribbon. I love how it turned out!

I painted one of the huge Just Blooms flowers with the pearl paint, then ink distressed another in matching ink and painted over that, too. I thought about making it as a gift, but it's another of those projects that I'm not sure I'll part with.

Tuesday, November 10, 2009

The big 4-0!

A friend of mine recently asked me to do a clear album for her hubby's 40th birthday. Since she's one of my favorite people, I readily agreed! She gave me creative freedom on the design, so I went with a sort-of sporty over-the-hill-ish type theme.

Here's how it turned out:


This used a Clear Scraps acrylic album, some Bazzill cardstock, a Jenni Bowlin bingo card, some Close To My Heart papers, letter stickers, button & chipboard; EK Success foam letter stickers, Making Memories star brads, chipboard, metal word & letter stickers, a little bit of Stampin' Up ribbon, Doodlebug letter stickers and Zip Dry Adhesive.
Speaking of adhesives, here's my take on the Zip Dry Adhesive:
Overall, I rate it an "A".
It is, overall, pretty clear and great for clear projects like this acryilc album. It held tight for all of the embellies I used here, from the transparency frame (on the page with the big striped star - I added it to the corners of the frame) - to the ribbon and button - to the metal word tags on the front of the album. It is definitely more visible on darker papers - not working with this glue before this album there were a few places I had to add some extra things to hide the slight mess on the reverse side. On paper, if you don't stick it down to your project right away it kind of got to that weird semi-sticky glue phase - kind of like what free samples are stuck to in the mail? Do you know what I mean - a little rubber cementy? But, it was easy to rub this off and start fresh. I really didn't need to use a lot of the glue itself. The applicator tip was awesome and stayed pretty clear. It's a little odorous - kind of like a light spray paint/super glue smell. But overall, it did a great job.
With any clear project, I advise trying your best to hide your adhesives with photos, papers or embellies on the opposite side of the project.

Wednesday, April 1, 2009

Say it with Love Accordion Album

I just finished the accordion album that I'll be teaching at a private workshop this weekend. This is the display album, but each guest has chosen her own paper packet, so everyone's completed album will be a little bit different.

For this I used my favorite CTMH paper packet, Emporium, and CTMH's 9x9 My Creations Memory Showcase Album. I sponge distressed the edges of all of the pages and the covers with Crystal Blue Ink, and the edges of all of the papers with Chocolate ink from Stampin' Up.


This album was pretty easy to complete. It uses minimal stamping - primarily with CTMH stamps, except for the short, fat swirl, which is Autumn Leaves. The album uses the coordinating Stickease set for most of the accents, plus a few Just Blooms and Prima paper flowers, some CTMH & SU ribbon, a CTMH Pretty Pin and a couple of CTMH Designer Brads and regular brads here and there.

Oh - I also used a scalloped circle card base from Stampin' Up, too, (page 3, above), but a regular solid circle would work great here too.
Notice anything familiar about these layouts? These are the finished product from my sketch post from last week. I'm pretty jazzed with how they turned out!

Thursday, November 27, 2008

Snowman Soup

Here's another fun gift idea.

Since it's Thanksgiving and all, some of you may have some of the glass jars that gravy come in. I ran mine through a sanitizing wash with my dishwasher, then filled with bulk hot chocolate mix and mini marshmallows.


I painted the lid with CTMH's Create-A-Shade Pearl Paint, covered the edges in fine glitter, and added a big CTMH snowflake rub on and bling to the top once it was done.
For the front, I used CTMH's All Decked Out to make the snowman and added two brads for buttons. I attached the little guy with strong double-stick tape adhesive that I picked up at Wally World. though you can't see it, I added some of the snowflake swirlies from the stamp set along the top and bottom edge of the jar using Cotton White StazOn. The ribbon is some that I picked up on super-cheap clearance a few months ago at Target. I also added some bling as snowflakes to tie in the decorations on the lid.